Tuesday, June 23, 2015

kitchen before and after

After my last post highlighting my "new" counters I started thinking about how much our home is continuing to evolve and although I've shared "before" photos of our kitchen before, I felt like now would be a good time to share again.

I just did a quick pairing of the 2 photos in Microsoft Paint to get a side by side comparison.
One thing I forgot to mention the other day is that after 9+ years of having a "grape theme" in my kitchen, I boxed everything up and it's ready to find a new home with my sister who coincidentally also has a grape theme so that worked out perfectly.
I'm keeping a couple of items because I truly love them but the rest is history. And I have to admit that so far I am loving my "theme free" kitchen lol.

Anyway, here is the before and after photo:

Click on the photo and you can see a larger version :)
It may be difficult to tell from the photos but we've actually made quite a few changes in our kitchen. The only major change we still have on our list is the flooring we will be adding within the next year. And of course I will be sharing more photos at that time :)

Remodeling is a slow process when you're working around a tight budget with a husband who doesn't get excited about new projects and that's putting it mildly. Slowly but surely however, our house is becoming the home we envisioned when we moved in. I can truthfully say that when I walk in my front door I almost always look around and feel pride in our accomplishments and that's a great feeling.

I may post some other room updates in the next couple days but there have been no major changes in the rest of the house. I've rearranged and updated the entry table and I might give you guys a glimpse of that tomorrow so be sure and check back!

Thanks for reading!!

Rhonda

Sunday, June 21, 2015

My faux granite "painted" kitchen counter tops

I've been trying for days to find the time get this post written but it's been a crazy busy week for me with one thing or another.  Finally though, I'm ready to share with you guys my freshly painted laminate counter tops.

The blue trim on my counters has been on my list of things that needed replacing since the first time we walked into this trailer. WHY would any person think blue trim on countertops would be a good idea?? The counters themselves were in great shape other than a couple little things and so replacing the counters has never been a priority with my husband. His thought process and mine are completely different when it comes to home improvement. He would have been content to look at those blue and white counters for the rest of our lives and it would have never occurred to him to replace them.  Sometimes I feel like nothing would ever be updated or fixed in our home if I didn't hound him. Knowing my husband the way that I do, and trust me, I do lol...I knew there was no way he'd be on board for new counters. So I started the research process to see what my options were and I was thrilled when I discovered that painting the counters was an extremely viable and affordable option. I broached the subject with him and he shot me down. Over and over he shot me down and I was beginning to get very discouraged. He just wasn't convinced that painting was a good option and "there was nothing wrong with the counters".
Let's just say that I'm a pretty decent contender when it comes to the hounding department and eventually I convinced him to at least watch a couple of the many YouTube videos relating to painting laminate counters.
After he watched the process and saw the results, he finally agreed that we could give it a try. I was super excited and we took off to Walmart for the supplies immediately lol.
I don't have any photos of the supplies we used but I will try to add one later. I can't get a photo at the moment because I have a sleeping 2 year old in my bed and I definitely am not ready to wake that particular sleeping dragon lol.  I'd rather face a grizzly bear than a 2 year old woken up from a nap too soon.

The first step in the process of painting the counters was sanding them just a little and then cleaning them very very well. We used mineral spirits for the final cleaning before the primer went on.  Once the counters are completely clean and dry you can start painting on the primer.

I'm going to share with you just a few of the photos I took before, during and after our painting.

Here is the *before* picture...You may notice that we also
painted the cabinets white and the wall a light gray :)
That's my youngest helping out with the sanding
first coat of primer

after 2nd coat of primer
This is after the first layer of paint was applied using
a sea sponge
This is after about 6 layers of paint and immediately before
the polyurethane process
This is a close up of the finished counter...the part that
use to be blue...how much better is this???

another close up of the finished counter


You may notice my "faux backsplash" behind the stove...
not sure if that is staying or if I'll decide to sand it down
and paint over it. I'm not sold on it but I'm also lazy lol

nighttime view

all tape removed and everything in place


Look how pretty and shiny!
And one final picture to show that we also painted the other side of the kitchen the same gray color we have in our living room so that the two rooms flow together quite well. Also painted the trim white...that was a job but so worth it.


And that's it...I absolutely love my "new" kitchen and especially the counters. Obviously, I can't speak as to the durability but I've read lots of good things and as long as we take care with them there should be no issues.

I can tell you that although the painting process was very simple it was also quite tedious. I actually practiced on a small area of the countertop itself before washing the away the paint and starting the sanding. I did that to get an idea for the look I wanted to achieve and also to reassure myself that I wasn't biting off more than I could chew.
We sealed with about 5 coats of polyurethane clear coat...I let my handy husband take care of that part because you don't want any inconsistencies or bubbles if you can help it. He first tried rolling on the topcoat but then decided to use a brush. It's not as smooth a surface as actual granite but it looks beautiful and it completely changed the look of our kitchen...and the total cost was under $40...now come on...how cost effective is that???
I'm sure this isn't something that everyone will feel comfortable attempting but if you're one of those folks who is considering painting your countertops then I say why not give it a try :)
One other thing I'd like to add is that there actually are products out there specifically made for this and you can google those. One of the products I came across during my research for this project is called Giani and they sell that in home improvement and hardware stores. I'm also pretty sure that Rustoleum has a similar product so if you would rather go that route then you will still find this very affordable. When I priced the Giani it was around $80 for the kit...not a bad price at all.

If you do decide to do this then be prepared to have your kitchen practically unusable for a few days...that was the most difficult part of the entire process for us.

I think that's it for this time...I hope you enjoyed my post and seeing my "new" kitchen. If you have any questions then please let me know.
Until next time, thanks for stopping to read and come again soon!
Rhonda

Friday, June 12, 2015

A quick hello!

Just a quick update to say hi and let everyone know I'm still here :)

I haven't done anything creative at all recently :/ and that's sad...But I have been busy so that's good. I'm in the process of a mini kitchen makeover. It started with the cabinets then moved to the walls and other areas (but that's a post for another day...after it's all finished lol). I'm hoping to finish by Sunday or Monday of next week so stay tuned for that.
I've been painting all week and my whole body aches...I think it's safe to say that unless someone else is volunteering I won't be doing anymore painting for awhile. Or at least til the urge strikes lol.
I'm hoping that once I get this kitchen project finished that my creative juices will come rushing back lol. I had grandiose plans of getting tons of layouts completed during summer break but so far those plans have fallen slightly short.

I'm excited for a little mini trip next week with a couple of my besties! The 3 of us live in different states and it's been way too long since we've all gotten together. I think this is just what I need to get rejuvenated and back on track. A few pictures from that trip may just find their way here and you guys won't want to miss that lol. 

Right now I have a sweet little 2 year old demanding my attention :)  Rememeber to check back soon for my kitchen mini makeover reveal!!

And of course, as always, thanks for stopping by and have a great day!

Rhonda

Thursday, June 4, 2015

Feels like forever

It really does...it seems like forever since I've made a new post. I've thought about posting but I really didn't have anything interesting to post about. Still don't, really. I've not been crafty at all in a couple weeks at least and although I feel the urge, I just can't seem to garner the motivation required to begin.

Here are some random things happening with me :)

Today marks 6 weeks since my sister passed away and I would like to say it's gotten easier but really it hasn't. I pretend it's fine and that I'm not broken inside and I do a pretty good imitation for the most part. Were it not for my other sister, I don't think I'd be making it as well as I am. She and I have had our issues, maybe more than most sisters but losing Kim really flipped a switch inside me. Family is so important and I'm going to cling a little more tightly to mine.

I started living low carb about 3 weeks ago after stepping on the scale and finding myself again at an all time high weight. I need to lose weight in order to be healthier and to feel better about myself so I'm going to. Period.

My baby boy, who's 13, has got a girlfriend. She's not his first but she's the first he's ever spent time with outside of school. He's at VBS with her right this minute. I don't know how it happened that I blinked and he grew up but if I could stop time for even a little while, I think that I would.

Yesterday I finally got a new camera. I've needed one for awhile but just couldn't justify the expense because my old camera was still going strong. But, last weekend I realized that "Old Faithful" wasn't being very faithful when it started having issues while I was taking pictures at my oldest son's fitness competition.
And when I tried switching to video mode it completely spazzed on me. It's just had several issues recently and as much as I loved it when I bought it EIGHT years ago lol...it needs a break. I have taken literally thousands of pictures with it as well as countless videos...it was a great camera. And it's not completely flubbed its dub just yet so I may get a lot more life out of it. BUT, I need a dependable camera.  So yesterday we made the unexpected purchase of a Canon Rebel T5. My awesome husband made the comment that "you can't scrapbook without a camera"--how freaking sweet is that??? Not for one minute did I feel the need to remind him that I have literally hundreds of photos already printed and waiting to be scrapped lol. We'll just keep that between us ;)

So the only thing I really have to share today are some pictures I took with my new camera :) I'm no photographer by any stretch but I hope to at least take better photos for my scrapbooks and of course for my blog.

Outside Chris's bedroom door looking in..experimenting
with different settings and angles.

The view from my back steps--testing the landscape setting

the coffee filter rose and mason jar I've shared in a previous post

The portrait setting...don't let his fake smile fool you lol...
he was not happy that I was invading his space taking pictures.

He wasn't happy but he cooperated...I have some other pics where
he does't look quite so amicable however. 

We got a new tent the other day for vacation and we
got it set up tonight to get it water sealed. It's huge lol.

Sorry it's not a more exciting post but this is my life lol.
Thanks for reading!

Rhonda

Wednesday, May 13, 2015

New layouts

I have been debating with myself over whether to continue to keep blogging my projects and since I haven't reached a conclusion as yet, I am going to share a couple of layouts.
I actually have 3 I need to post but one of them was ornery and refused to let me get good a decent photo so I'll save it for next time :)

The first layout is the only photo I got of Garrett on his first day of Kindergarten. 
The title was made using some alphabet stickers that I've literally had for years. I just laid them out on white cardstock and overlapped them the way I liked them and then cut around the outline to create the title. I added some Diamond Stickles to some of them to add some sparkle...the title is my favorite part of this layout (except the photo of course). I also added some Stickles to the little tree at the bottom. I really dug deep into my stash for a couple of the elements on this one...the flag is a sticker I've had for probably 10 years. Of course there are plenty of recent products on there as well. 
I'm also finally starting to see the allure of the Washi tape lol...I used 2 different types on this layout.


Had these corkboard letters for years as well.


And here is the second layout I want to share for today. I struggled with this one as I usually do when I want them to be "good". Unfortunately, nothing really clicked with this one and I felt like I started gluing stuff down just to get it off my desk. 
I think a lot of my frustration stems not from creating the layouts themselves, but rather from the cramped space I have for crafting. I tend to get aggravated and it affects my creativity.
I'm actually tossing around the idea of displaying this one in my bedroom...just have to figure out how and where lol. 

The background cardstock started out solid white and I used several different sprays to get the look I wanted. Unfortunately, if you've ever used heavy spray on a paper project you know that the paper tends to warp. That's what happened here. It'll be fine once it's in a page protector but it did make it difficult for me to get a really good photo.
I used lots of goodies on this page and as much as I struggled with it, I actually do like it. 
I'm taking full advantage of the gold trend lol...and I'm loving it. 
I cut the title with the Expression and embossed with gold embossing powder. It turned out great. 
Also, I used some ancient gold metallic rubon over the texture paste I used.


More layers on this one that it appears...and the mist I
used on the red heart doilie I made myself because I didn't
have anything in the color I was looking for. Love how it
came out :)

Gold thread, some different ephemera and gold
Stickles...Glimmer mist too.

I'm not going to list all the supplies I used but if there's something  you see and you're curious, just give me a shout and I'll be happy to share :)

That's it for now...thank you to everyone who stops by!
Have a great day and check back soon!

Rhonda

Tuesday, May 5, 2015

Dealing with loss and regret

Today's post is not related to scrapbooking or crafting. Today, I want to talk about loss, grief and regret.
Just the thought of typing the words has me in tears but that isn't surprising as I've cried so many tears in the past 12 days that I wonder how they are still able to flow so frequently and abundantly. Twelve days ago my world and the worlds of so many people completely changed when my youngest sister passed away suddenly and unexpectedly. I don't know how long a person can live in shock or denial but I'm pretty sure I'm still at that point. It's so hard to mourn when your mind hasn't completely wrapped around the fact that she's gone. I know she's gone but it still doesn't feel real.
I hadn't spoken to my sister in a few months...not because we'd fallen out, not because I was angry with her, not because I didn't want to talk to her and certainly not because I didn't love her. I thought about her every single day...EVERY day. And just about every day I thought about calling her but I kept putting it off. "As soon as I finish so and so..." Or "after this or that..." but as good as my intentions were, it just never happened. The fact that I am not a big phone talker probably contributed but the point is that I didn't call. I didn't reach out to her and tell her that I was thinking about her or how much I loved her.
And now I have to live with that.
People who knew my sister knew she was loud, obnoxious and possibly a little crazy sometimes. But the people who really knew her knew that she was a loving person with a heart of pure gold. I've seen people do her wrong time after time and yet she didn't turn her back on them. She might yell and scream and throw a few (Ok, a lot of) obscenities their way but at the end of the day she would have given the literal shirt off her back to those same people. She lived a hard life and she struggled a lot but she always made it though and rarely did she ever ask anybody for anything. She was a good and kind person and she will be missed more than she would have ever imagined.
I'm not going to go on and on but I felt like I needed to acknowledge her death-- if for no other reason than my own peace of mind.

Losing her so suddenly has made me even more conscious of the reason I started scrapbooking 12 years ago. While she left behind photos for her children, there are none of her personal thoughts, feelings or memories associated with those photos. I want to leave more for my children and grandchildren...maybe it's selfish and maybe it means more to me that it ever will to them...I have no way of knowing, but I do know I'm going to keep scrapbooking and preserving as many memories as possible.

I want to share a couple of older layouts with my sister as the subject. These are just quick photos I took of the layouts still in the page protectors so not the best quality.


This is one of my earliest layouts...that's me and my sister
quite a few years ago. We were at Mama's for Thanksgiving.


journaling is blurred...I have always loved this layout. It's
a great picture of her and it has lots of sparkly :)

That's it for today guys. I actually have a couple of layouts completed that I haven't shared with you yet and I'll try and get to that  later this week.
Thanks for coming by!

Rhonda

RIP Kim...you are loved and will never be forgotten.

Wednesday, April 15, 2015

Breast Cancer Awareness Mixed Media Canvas

I think I mentioned in my last post that I had a project that I was working on and that is what I want to show you today.

First, let me say that nobody asked me to create anything to donate for this benefit. I took it upon myself to create this canvas in the hopes that it might catch the eye of someone at the auction and bring in an added donation. I was not under the misconception that it would sell for a lot of money. If I'm being completely honest, then I was hoping that it would sell somewhere in the range of $15-$30.
And again, I realized going in that the people who would be attending this auction/benefit were not generally the type of people who would recognize the amount of time and effort spent on a project like this.

Let me share my canvas with you and then I'll tell you how much it brought at auction ;) Now how's that for keeping you reading? Haha...I'm just a regular Ryan Seacrest wannabe lol.


***I encourage you to click on the photos and open them to see a better
photo.
This is an 11x14 size Canvas Panel
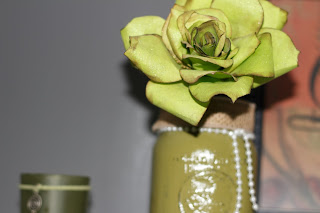
Every single flower is handmade from cardstock. The bead
spray was also made by me. All awareness ribbons, the birdcage
and butterflies are all cut from paper and embossed.


I'm going to go through an explanation of my creative process and I'm sorry if it drags...I'll try to be as quick and concise as possible.

I began with a blank 11x14 canvas panel. I covered the panel with Gesso and when it was dry I proceeded to add my layers of paint.

Once the paint was dry the first thing I did was add some texture using Liquitex Basics Modeling Paste and the Tim Holtz "dot fade" template.

I then added a coat of Mod Podge and my quote which was cut with SCAL2 and Cricut Expression2.
 I used Tattered Angels Glimmer Mist Viva Pink to give a gradient look to the canvas. I sprayed from the bottom toward the top and overlapping some of the wording.

I then covered with a second layer of Mod Podge.

After the Mod Podge was dry I used Goosebumps Shimmer spray on a good portion of the canvas but not all.
I used Tim Holtz tea dye distress ink to lightly highlight the edges of the canvas.

At this point it was time to begin the process of adding all the yumminess :) I made quite a few cardstock roses for this project. I also cut some breast cancer awareness ribbons in a few different sizes, a birdcage and some butterflies. I also created the bead spray from beads I have in my stash.

I'm not going to go into every tiny detail but I'll just say that I spent approximately 10 hours on this canvas. There is a lot of heat embossing on the flowers, ribbons, butterfly and the birdcage.
The chipboard swirl and tiara are also heat embossed.
The fiber you can see is actually a piece of cheesecloth that I sprayed randomly with Glimmer Mist...making sure to spray some areas more than others to give a variation in color. Once it was completely dry I adhered it to the canvas with hot glue. I layered all the flowers and goodies across the cheesecloth.
The final touch of the completed canvas was adding random smidges (hey, it's a word lol) of Stampendous Shaved Ice glitter across the canvas

I'll actually add a complete list of supplies at the end of this post.

I am never one to "toot my own horn" and I'm rarely completely satisfied with anything I create. I put a lot of effort into this particular project because I knew it would be on display and I have never been comfortable with that. But with that said, this canvas really turned out beautiful and the pictures really don't do it justice.

I wasn't able to stay for the actual auction due to the fact that we had family in town unexpectedly and I also had my 2 year old grandson with me. On the one hand I'm thankful that I wasn't there and on the other I'm not.
I received a text message later that day from a friend telling me she had actually purchased my canvas.  She paid $5. She said she loves it and that makes me happy.
But to say I felt like I'd been slapped in the face would be an understatement. The stand that I included with the canvas was $5.99. The absolute ONLY consolation I have is knowing that this friend is also a scrapbooker/crafter and can appreciate the time and effort that went into this project. I'm very thankful that at least she is the one who bought it. But, if I'm being honest (and I am because it's my blog lol) then I'd rather have brought it back home with me.
I'm glad I left a cash donation as well as the canvas or I'd feel as if I contributed nothing.
I guess this kind of comes across as bitter and I don't want to leave it that way. Life is filled with lessons and I learned one. I will never put myself in that particular position again but I'm not going to lament over my perceived injustice either.

And that's all I have to say about that. I have a layout to share later but I don't have to time at the moment. Just be sure you check back soon :)

I'm going to add my supply list for the canvas and please, if you have any questions at all just let me know!
Thanks for taking the time to read my post and have a great day!!


*SUPPLY LIST

The paints I used are:
Apple Barrel Valentine Pink
Folk Art Metallic Garnet Red
Folk Art Metallic White Pearl.

Tattered Angels Glimmer Mist Viva Pink
Liquitex Basics Modeling Paste
Tim Holtz Dot Fade template
Tim Holtz tea dye distress ink
Goosebumps Shimmer texture spray
EK Success flower punch
Fiskars flower punch
Stampendous Fran-tage aged ivory embossing powder
Stampendous Fran-tage aged rose embossing powder
Ranger embossing powder Pink
StampCraft embossing powder gold
Chipboard...swirl and tiara
string pearls His & Hers (Hobby Lobby)
Leaves Wild Orchid Crafts
Gems Paper Studio
Tim Holtz stories "hope" ticket
Stampendous Fran-tage Shaved Ice glitter

Tuesday, April 7, 2015

The ugly world of menopause

I can remember not so very long ago when I was wishing for menopause to come and take away the curse. It couldn't be that bad, I told myself.  As someone who has done some major suffering each month since the age of 11, I just knew menopause had to be better. Well, I suppose in a way it is, but my goodness, it certainly hasn't been the easy street I was hoping for. I'm still in the early stages but it's pretty much hit me full force the last few months.

This pretty much sums up my thoughts on this thing called menopause lol

I've likened it several times to the feeling of PMS on steroids and that is actually a pretty accurate descriptive. At least it has been for me.
My emotions are all over the place...I've had more downs than ups recently which has been extremely difficult due to the fact that I work hard to maintain a positive outlook. I'm a pretty happy person with a pretty great life...but this menopause is a thief robbing me of joy that I've earned and that I deserve.

The hot flashes...oh those hot flashes, lol. Again, I thought I was looking forward to those. I've been cold natured my entire life...like SERIOUSLY, cold natured. I actually still am for the most part...but when the heat comes, it comes hard and fast. It starts around my neck and the back of my head usually and then radiates to the surrounding areas...most especially my head, face and shoulders. It's like you're burning from the inside out. WHAT. THE. HECK.  We'll just say it's a miserable feeling and leave it at that lol.

And the headaches? Holy....yeah, the headaches are almost unbearable at times. I suffered with migraines when I was young. After having my oldest son, my migraines pretty much disappeared. I can count on one hand the number of migraines I've had since then. Until now.
And yes I know some people think every headache they get is a "migraine" when they actually have no idea what a migraine is (that's actually a pet peeve of mine).
Luckily I've only had a couple of them since menopause started, but I've had almost daily headaches. Like, really bad headaches--not quite a migraine but still incapacitating. They have been horrible and that's putting it mildly.

I am going to skim over the weight gain...

Gosh, I could go on and on but I think you get the idea lol. It's been one of the least pleasant times in my life and I hope it passes quickly. I'm very anti medication but over the past few weeks my husband has been gently nudging me in that direction lol. God love his heart lol...he's not been sure what to make of this menopausal me.
And when I say I'm anti medication, that doesn't mean I'm just completely against all medications...I'm just not one to rush to the doctor for medicine for every issue that pops up. I have my own personal issues and reasons for feeling that way. But I will say that it's not out of the question at this point. I'm having a pretty good week this week and I'm just taking it a day at a time right now.

But I can't let this get me down...I have a couple of projects that I need to get completed this week o.0
Speaking of projects, I better get myself over to my craft desk and start making some roses I'm going to be using on an altered canvas this week ;)
SO be sure you come back soon and see what I have to share...it's going to be prettiful! :)