Sunday, December 28, 2014

Memorial Christmas Ornament

Hi! ((BIG WAVE!!))
I want to share with you all a couple of projects I've done this past week, taking advantage of my vacation from work. The first thing I want to show you is a canvas I made for my son's girlfriend as a Christmas gift. Having moved here to Tennessee from Florida several years ago, she often finds herself missing the sand and sea and wanted to incorporate a nautical theme into their home. With that in mind, I created this 8x10 canvas with what I hope has a beachy/nautical feel.


The quote says "if you want to know how much
I love you, count the waves in the sea".
The shells are actual shells we brought home with us
from our last trip to Panama City Beach.
Just to give a slightly different angle/view
This photo is wish no flash so that you can see
a little better the way the glitter really looks. I think the
camera flash always gives a touch of distortion to most projects.

I so wish I could capture how good the paint truly looks on
the canvas. I used several colors to get the look I was going for
and I was extremely pleased and happy with the end result.

The second project I want to share is a memorial glass ornament I made in
memory of my mom who passed away in 2012. It's a  project that I've had inside my head since she passed but I could never seem to make myself start it. I still struggle daily with the grief that I can't seem to shake. 
I plan to make a total of 5 of these ornaments--one for myself and one for each of my siblings. My hope is that they will love and treasure the ornaments for many years to come. Although Mama is never far from our hearts, I hope these ornaments will help to keep her Christmas spirit alive in each of us.

Making the individual flowers is the most time consuming aspect of this project. Once the flowers were made, the project was finished in no time. 

A little close up so you can see a little of peek at
the goodies inside the ornament which include
some loose pearls, glitter, sparkle flakes (what ARE
those things called?? lol) flowers, a quote and also
the dates of birth and death.
The quote reads, "loved always; forgotten never"
Again, just a slightly different angle.
 NOTE: vinyl used on the glass ornament project was purchased from
              www.expressionsvinyl.com  and I recommend them every chance I get. 
              I've never been disappointed in any vinyl I've bought from them AND 
              shipping is incredibly quick. *I am not being paid in any way for saying 
              that lol!

And that wraps up today's post. Any questions, feel free to comment! 
I'll be back to make my Christmas post in the next couple days!

Have a great night and check back soon!

Rhonda


Monday, December 22, 2014

Christmas memories old and new

As I'm typing this it is only TWO days until Christmas Eve and I am getting so excited!
As far back as I can remember, Christmas has been my favorite holiday. When I was a little girl, I can remember how absolutely magical Christmas felt. It wasn't just the tree and the lights, or just the gifts, which were far from lavish or extravagant. No, the magic I'm referring to was something in the very air, something you could almost palpably feel.
I've mentioned before here on the blog that I grew up very poor. I can remember more than one Christmas when our gifts were special gifts that Santa had saved from the "Island of Misfit Toys" (as referenced in the old Rudolph the Red Nosed Reindeer" cartoon). The toys weren't the latest or greatest but they were from SANTA and that made them special. I was so happy to get those naked Barbie dolls covered in ink scribbles with matted hair because Santa Claus chose ME of all the children on his list to receive those misfit toys. I don't remember feeling any disappointment whatsoever!

Mama loved Christmas but I imagine it was very difficult for her year after year not knowing how she would provide gifts for us to open on Christmas morning. If she let her worry or stress show then I was oblivious to it....all I felt was wonder and happiness.
I also remember each year thinking that our tree just had to be the most beautiful tree in all the world. We would traipse through the fields looking for just the perfect round, fat cedar tree to call our own. Mama would fit the tree into a 5 gallon bucket and fill in around the trunk with rocks and gravel to hold it in place. Some years she would even have to tie a string around it and attach it to a nail in the wall to keep it from toppling over. Mama would cover that tree with so much garland and tinsel that it glittered like diamonds! My mama surely loved tinsel lol. I, unfortunately, don't have any photos of those childhood Christmas trees but I certainly have my memories of them!

After I became a bonafide adult (not sure when or how that happened lol), I slowly began to associate Christmas with stress rather than joy and I let it become a chore to me until there were years when I didn't enjoy it at all. It took awhile but I have slowly but surely learned to control the stress and Christmas has once again become exciting and magical to me.

I couldn't wait to get my tree up this year and I started shopping in September so I wouldn't be stressed with the shopping aspect.
So, with all that said, I wanted to share with you some pictures of our home decorated for this wonderful holiday that is CHRISTmas. I realize not everyone feels that Christmas is based on the birth of Jesus and I respect that...I hope that you will all also respect my belief of the opposite :)

The view coming into the kitchen 

The small tree centerpiece on the table in the kitchen


Some of the pretty packages underneath our tree!

The top of the gas fireplace...this tree is about 2 ft tall I think

The red block "gift" on the left was something Brandon
made in elementary school...I think PreK. And the Frosty
on the far right is musical and I picked it up from one of my
favorite stores, Goodwill, lol. 

This amazing cookie jar was also picked up from
the Goodwill this past weekend for $4.99 and I
absolutely LOVE it!!

And here's the entire living room as seen from
directly in front of the front door.


And THIS is a picture I took with my phone
using the Panorama feature, hence the reason
you can see the entire room and it has the
curved effect. 
I promise it doesn't look nearly as cluttered in person :) It's actually
quite festive, if I do say so myself. There are a few other small pieces of Christmas scattered about the house but this is the main part.

If I don't post again before Christmas, then I want to wish you all the happiest Christmas ever! Enjoy your family and friends...laugh, be merry and make wonderful memories!!

As always, thanks for stopping by and come back soon!!

Rhonda

Sunday, December 14, 2014

Easy holiday projects

Hey y'all! December is half over and Christmas is fast approaching which means there's a flurry of craft projects going on at my house. We have one week of school and then it will, thankfully, be Christmas break...not that I'm counting the days or anything lol. Oh, wait, YES I AM haha! On the one hand it's hard to believe the school year is half over, and on the other I'm like, COME ON SUMMER!
I'm about 2/3rd's of the way finished with my Christmas shopping. If only time and money were no issue, right? But, I'm so blessed and I refuse to let stress dampen my holiday spirit this year. Life is GOOD and I am so thankful for my overabundance of blessings.

Now onto the crafty stuffs ;)

 If you haven't seen it already, you can see my altered wooden monogram here --->>  Wooden monogram

In addition to that project, I have also been working on a couple other things as well.
Several years ago I decided it would be cute to make some mittens from chipboard (just a thick cardboard) and decorate one for each person in our family to display at Christmas time. I loved the mittens and couldn't wait to get them out each year and those chipboard mittens I made on a whim are still one of my favorite holiday decorations. As our family has grown I've had to add mittens and this year I had to add FOUR! While they aren't difficult to make, they can be time consuming. I just freehanded the mitten shape and tweaked it with sand paper to get it smooth and I'm still using the same pattern so all the mittens remain uniform in shape and size.
 So the first thing I want to share with you today are the newest additions to our "mitten collection". And if you have any questions on how to make these then absolutely let me know and I'll be happy to tell you! I could probably even be persuaded to share my "pattern" but you really don't need one.

Like most projects, this one is really so much
prettier in person. All the swirls are stickled in Crystal Stickles
and it's very sparkly. For the top of this one I used a
circle punch and an old shiny red gift bag I had saved in my
stash from who knows how long ago, lol. 

For the top of Lilly's mitten I used Flock from
Doodlebug Designs. If you aren't familiar with flocking, it's
a powdery crushed velvet type substance. You apply it
much the same as you would glitter. And it feels soft, almost like velvet
when it's dry. 

A medium granule type glitter for this one...it has an
iridescent look and it's perfect for Cadence's mitten...I love it!

I've added this photo and the next of the same mitten just to show how sparkly it actually is
as the camera flash really detracts from it in the next photo. 


And this next photo is actually a picture of the clock that I have the mittens displayed on. I just wrap it in some greenery and each mitten is attached with a small clothes pin on the back...it works out perfectly and looks so festive and fun!
I hate that there's a glare on a couple of the mittens so that
it's difficult to see all the details and you can't see the
full effect but maybe you can see from the photo just why
this is one of my favorite decorations...perhaps it's because some of
the people I love most in the world are represented right here :)
And, just in case you're interested, I've put together a walk-thru of my Christmas mittens and you can find that by following this link OR by searching my YOUTUBE channel which is called "TralaceLife".

CHRISTMAS MITTEN VIDEO  <<<<CLICK HERE to watch the video!!

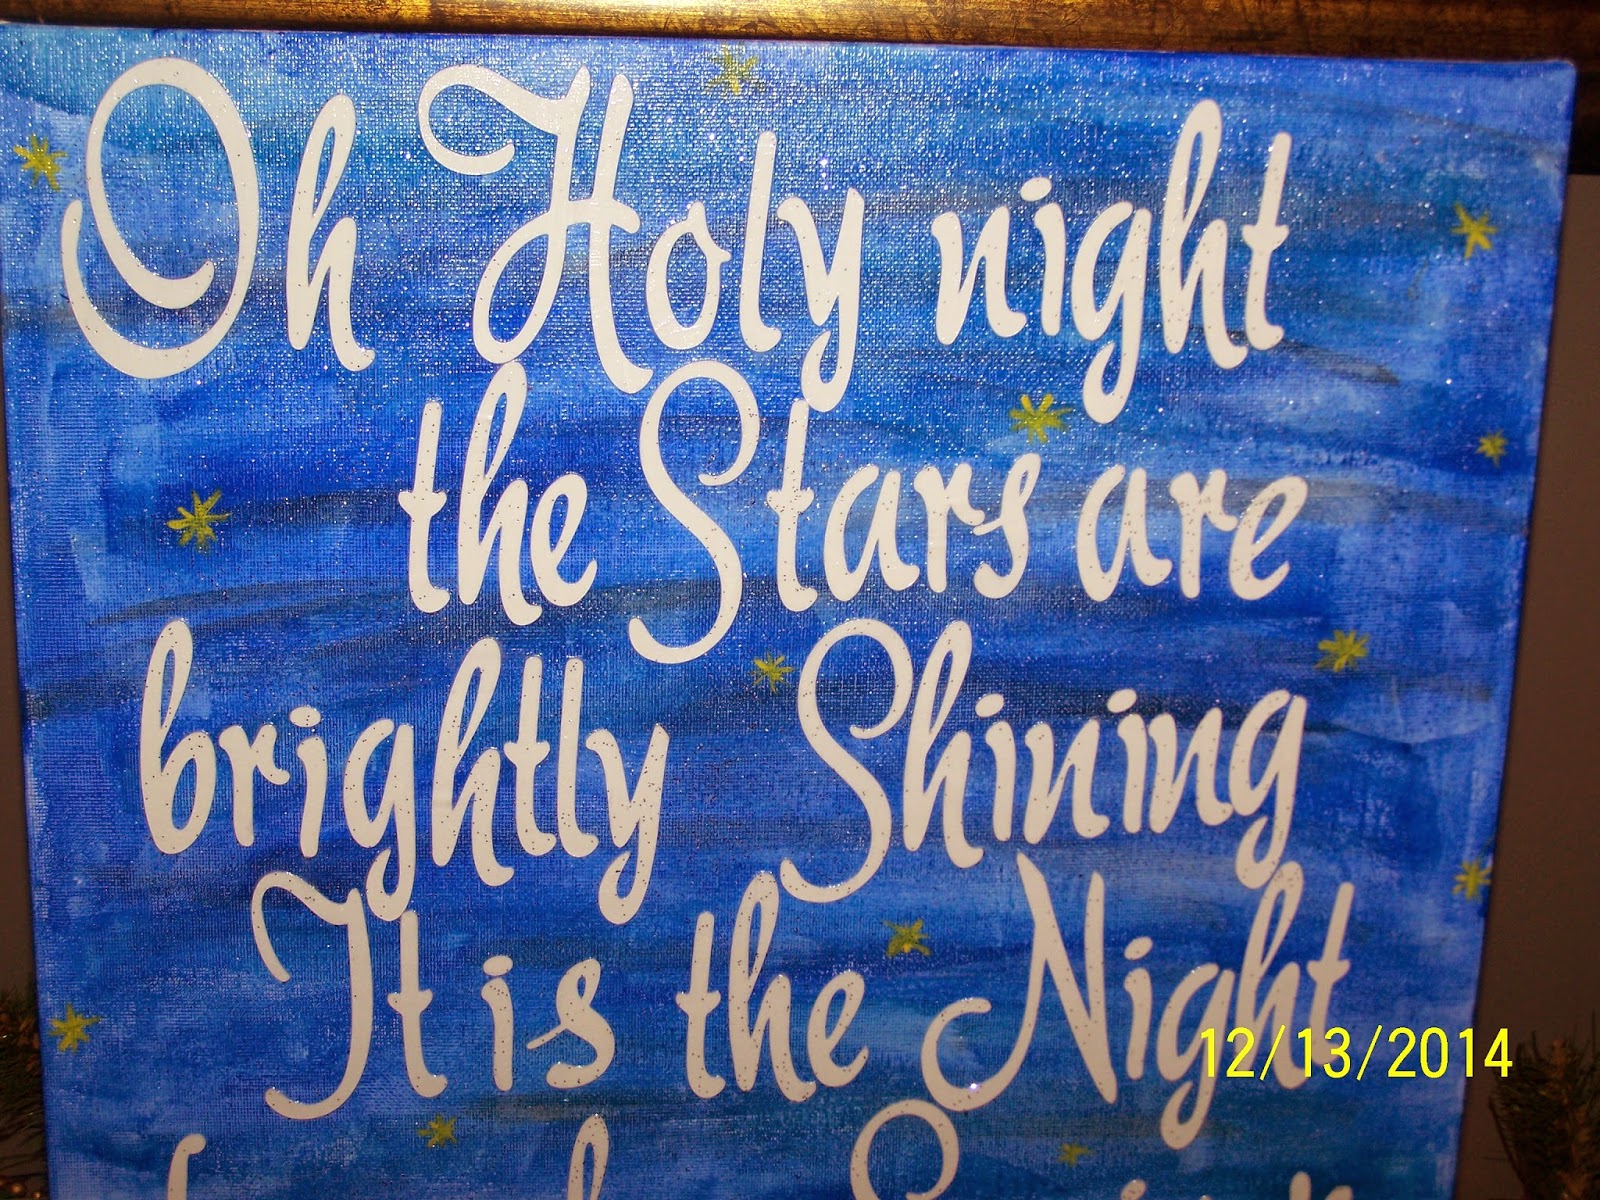
With the mitten project completed for this year I wanted to paint a canvas to display on the side/entry table. I have so much traditional Christmas things displayed and I really wanted to go more a Christian route with the canvas but as I've said in previous posts, I'm not an artist by any stretch and I struggle with even drawing stick figures lol. And trust me, you never want to be my Pictionary partner haha.
So, that being said, I kind of cheated with my canvas panel. I got a 3 pack of 16x20 canvas panels from Walmart for $7.99 rather than using some actual canvas I already had simply because I wasn't confident in my artistic ability and didn't want to destroy a perfectly good canvas lol.
 I used my Cricut Expression and my SCAL2 software and the akaDora font, for the lettering and images on the canvas.
I used:
acrylic paint, also from Walmart to paint my "night sky" background. I used 2 colors of blue, black and a yellow for the "stars". I also used some fine silver glitter and modpodge to seal and protect. Really, I know I say this too often, but the pictures really don't do this canvas justice...the hint of glitter was a great addition which was added at the last minute to the still wet mod podge (I added a second coat after that one dried)
The most difficult part of this project was getting the letters lined up well enough to look decent without touching or overlapping any more than necessary. But, I sat in the living room floor and did that while watching some of my favorite Christmas cartoons (Rudolph and Frosty, in case you were wondering lol).
And without further ado, here is the finished canvas panel. I love how it turned out!

Here is the first photo WITH FLASH
And a second photo with NO FLASH...which is a little better
representation of the actual colors but harder to see the details. 
And a 3rd photo just to show more detail in the painting. It's not
nearly as pronounced in person as it appears in this picture.
And the last thing I want to share with you this time around are some ornaments made from nothing more than cardstock, acrylic paint, glitter, sequins and mod podge. Simply hung with ribbon and they turned out beautiful.
We had so much fun working on these last weekend...my daughter in law, Danielle, her daughter, Chris and myself. Later on, Justin painted an ornament as well and I'll try to get a picture of that one on here as well.
These were SO super easy to do. I let Lilly pick which shapes we'd be working with--Christmas trees, basic ornament shape, hearts and starts. I cut them out on the Expression and used the trusty old hole punch to make the ribbon hole. Then all we did was paint and decorate them however we wanted and when they were completely dry I covered both sides with glossy mod podge. (Mod Podge should be paying me LOL). Once the MP dried completed, I tied the ribbon through the hole and voila, gorgeous ornaments for our trees!


Lilly made this one for me and it's my
favorite of the entire day :)  It says "nana"


Although the month is half over, I still have projects to get started and finished so I thank you SO much for stopping by. And as always, please don't hesitate to let me know if you have any questions about any projects I've posted. I'm always happy to answer questions.

Be sure and check back soon to see what's new in my world!

Rhonda

Friday, December 5, 2014

Wooden monogram

Hi guys! I finally finished the large wooden monogram letter I had been working on as a Christmas gift for Lauren, one of my "almost" daughter in laws :) I'm fairly certain she has never read my blog so I feel relatively safe posting this. And of course if she were to see it I don't think it would be that big a deal. But still, I'd like it to be a surprise so let's all keep our fingers crossed lol.

I picked up the giant wooden letter from Hobby Lobby...normally priced at $12.99 I think. But, it was my lucky day because the day I was there they actually had them at 50% off--WOOT! The dimensions are 18 inches in height and approximately 13 1/2 inches across so this is a good sized monogram.

I tried to pick out the smoothest one I could find but still had quite a bit of sanding to do before I could even begin the process of painting. Eventually though, I had it sanded and ready for paint!
I used a plain black acrylic paint from my stash and Glossy Mod Podge for my sealant.
Basically, I painted it a couple of times to get good coverage and then covered with a coat of mod podge,  I then added the lettering and photos and mod podged that a couple more times as well.
Eventually, after making all the flowers and working the pearls and flowers together, it was FINALLY time to start the fun part of putting it all together and trying to create something beautiful. I am happy with the finished project and I hope that it's something that Lauren will be proud to display in her home for a long time to come. It's always a surreal feeling when you take something as plain as a raw wooden letter and turn it into something to, hopefully, be cherished.

Here are a couple of photos and (gasp!) a video as well! I really stepped outside my comfort zone making and posting a video but I figure it's nice to do that every now and again ;)

link to youtube video <<<-------CLICK HERE


First, here's a BEFORE photo...just to give you an idea of where I started. The photo is slightly deceptive in that the letter looks completely smooth when, in fact, it wasn't. The grooves were especially rough. I guess I'm going on about the sanding because I wasn't expecting to do quite so much of it lol.


I really hope you enjoyed today's post and I hope you come back soon to see what else I might have going on!

Rhonda

Monday, November 24, 2014

Wrapping paper bows

Oh my, Thanksgiving is just 2 days away and Christmas will be here before we know it! I admit that I've been antsy to get my tree up but the big guy nixed me at every turn. He insisted we had to wait until after Thanksgiving before any Christmas decorations could make an appearance and I grudgingly admit he's right lol. But, next week my tree will be up and in anticipation of that, I decided to get a head start on wrapping some of the gifts I've gotten already. I actually bought my first gift in September and I've been getting a couple here and there ever since. It just made sense to me to start early to avoid the stress I've endured in the past by waiting until the week before Christmas. YES, that's been me more times that I'd like to admit. But no more! When the holiday became so stressful that it was no longer enjoyable I knew it was time to make a change. It's also much more cost effective to do it this way, rather than trying to come up with hundreds of dollars in a week or two.

But that's not really what this blog post is about....As I was wrapping today and making some paper ribbon bows to adorn my wrapped packages, I thought it would be a good time to share with others who maybe hadn't thought of it or had seen it before but had forgotten to try it.  I like to decorate my packages so that they look attractive underneath the tree and we all know that buying pre-made bows can be expensive if you buy the prettier ones. So, what I've been doing for the last few years is taking my wrapping paper and cutting it into strips of about 6-8 inches long and maybe a quarter inch in width. I then use my scissors to curl it just like you would do for strips of ribbon. Usually, I add just a small amount of ribbon as well to enhance the way it looks but it's certainly not necessary. I take all the strips and layer them the way I want them and I use a stapler and staple them together before attaching them to my package with a small piece of clear tape.  THE best thing about doing this is that you always have the perfect "ribbon" for your gift!

*NOTE: I'm not sure how well this would work with cheaper wrapping paper, but it works perfectly with the heavy duty paper I use. I get most all my wrapping paper from Hobby Lobby...on sale you get 100 sq. ft for about $4 and it literally lasts for at least 2-3 years so it's well worth the price.

Here are a couple of examples from some gifts I wrapped today.

I hope you can understand what I'm talking about
and this serves as a decent example. 


Your strips absolutely do not need to be completely uniform in size
either as it's virtually impossible to tell once they're curled and
on your gift!


ETA: Here are a couple more examples of wrapping paper bows I made this year. And really and truly the photos do not do justice to these bows. Give it a try and see for yourself!


For these I cut the strips about 12 inches or more in length and also more of them. You can really be as extravagant as you want with these...the more the better!
As always, thank you so much for stopping by and be sure and check back next week to see what's new!
Happy Thanksgiving from my family to yours!

Rhonda
Sorry for the glare...I used some thin silver ribbon on this one
and the flash got it. I know it's hard to see much of the detail but
hopefully you get the general idea. And I only used a few strips on this gift ...just
enough to make a small "bow". 

Wednesday, November 5, 2014

Craigslist SCORE for me!

Sometimes I just peruse Craigslist with no idea of what I'm looking for, just seeing if anything jumps out at me. I've picked up several things that way and I've been happy with all of them. So on Sunday before last I was doing just that, looking through the ads figuring I wouldn't really find anything when an ad came up for a shelf that was almost identical to one I had been looking at when we bought our couch. I immediately sent a text message to the number listed and we drove straight to Knoxville to pick it up. I was thrilled with it even before I saw it. I knew it was a black shelf and I had wanted a white shelf but hey, I have a lot of experience painting haha. So here is the shelf sitting in our yard after we got it home.
 How awesome is that bad boy? And did I mention that it was an absolute STEAL at the incredibly amazing price of $20???? Yes, I said twenty dollars!!
I wanted to get regular paint and use a roller and paintbrush but my husband who is usually pretty smart about this stuff insisted that spray paint would give the cleanest look so we picked up a total of 8 cans of paint and he did all the painting. Unfortunately, the spray paint wasn't the greatest idea for this particular project and we actually wound up getting regular paint to finish it up. I absolutely love how it turned out!
The only downfall with the entire project is that the shelf doesn't even come close to fitting into the spot I had designated for it. So after moving it a couple of times I decided on this placement and although it took me a couple of days to get use to it, I actually really like it here. I've always wanted some sort of divider between the living room and kitchen and now I have just that. I still need to get more "shelf stuff" to fill it but here is the finished product!!


This is no lightweight shelf --it is very heavy and well made. I am thrilled with my latest Craigslist find! Even with the paint we spent considerably less than what we would have paid for this shelf new in the store. This may be my favorite find to date. What have YOU found that you love on Craigslist?

Thanks for stopping by and come again soon!

Rhonda

Halloween at our house :)

We use to live in a small subdivision that was the hub of all trick or treating in our town. I'm talking--if you went trick or treating then our neighborhood was *the* place to be. The kids would start coming at around 4:00 p.m. and would continue coming until at least 9:00 p.m. To say I loved it would be an understatement of great proportions lol. Unfortunately, we now live on a little side road in the country (3 miles from town) and we have lived here for right at 6 years. And in all those years we've gotten ONE trick or treater and that was because I begged on Facebook haha. And yet, every year I buy loads of candy "just in case" with the knowledge that there has always been enough people here to devour the leftovers. And of course, this year was no exception. I got out the cackling witch hand candy bowl (bought on clearance from CVS a couple years back) and filled it to overflowing with candy.
It was a cold, ugly, rainy Halloween this year so I knew this wouldn't be the year of the sudden influx of trick or treaters but that was A-OK because THIS year I knew the grandkids would be here :) And let me just say they WIPED US OUT of candy hahaha.
Here are a few of my favorite photos from Halloween 2014.
This is the first year that I have dressed up since Tim and I went to a Halloween party several years ago. I think I did a pretty bang up job on my witch face lol

Our grandson...the spooooky skeleton lol

2 of my *daughter-in-laws* and our step granddaughter
I LOVE all these girls <3

Our second son, Brandon. He had to change a
flat tire in the cold and rain which is why
his pants aren't too clean looking lol. He was a
trooper though and still went with the kids trick or treating :)

Danielle is taking her turn wearing my witch hat

This little girl may have only been in our lives
for a year but we love her so much and consider
her our granddaughter. And didn't her mom
do an awesome job on her makeup???

Nothing scary about this little cutie pie <3
She was the cutest Lambie in the whole wide world :)

Had to toss in this picture of Chris showing Cadence
a video. He is so amazing with these kids and it makes
a mama's heart happy :)
And there you have our Halloween--Perhaps next year will be the year
that we get bombarded with trick or treaters, but if not, I think we are perfectly
content with our little entourage of spooky spooks :)

Thanks for stopping by and come back soon!

Rhonda